
Welcome to the Puzzling For Fun FAQ. Looking for answers to your questions about puzzling? Need ideas on getting the most out of your puzzling time? We’re here to help!
A Brief History Lesson
Getting Started
Choosing Puzzles
Unboxing
Assembling
All Done
A Brief History Lesson
In the 1760s, a London engraver and mapmaker named John Spilsbury mounted maps onto thin wood and cut along country borders. These were called “dissected maps,” and they were teaching tools for geography. Children learned empires by literally piecing them together. Education, but with sawdust.
The pieces were cut with fine marquetry saws. The term “jigsaw” did not yet exist. That name would arrive much later.
By the early 1800s, puzzles drifted from schools into fashionable homes. They were still hand-cut from wood and therefore expensive. Solving one was an elegant pastime, like drinking tea while outwitting Europe.
In the late 19th century, the invention of the treadle-powered jigsaw made cutting intricate interlocking shapes easier and faster. Now the name made sense. The puzzle and the saw became linguistic roommates.
In the early 20th century, cardboard replaced wood. Production costs dropped. Puzzles multiplied like cheerful confetti.
The 1930s were the golden age. During the Great Depression, jigsaw puzzles became wildly popular in the United States. They were inexpensive entertainment in a time when wallets felt thin and evenings felt long. Weekly puzzle releases were common. Families gathered around tables lit by single lamps, building pictures one stubborn sky piece at a time.
After World War II, puzzles remained a staple hobby. Advances in printing allowed vibrant artwork, photography, and eventually licensed imagery from films and television. By the late 20th century, you could assemble everything from pastoral cottages to movie posters.
Brands like Ravensburger and Springbok became household names, known for quality cuts and satisfying “click” fits. That tiny snap of two pieces meeting is a small, triumphant drumroll.
Today puzzles range from 100-piece children’s sets to 40,000-piece leviathans that occupy dining tables for weeks. There are 3D puzzles, mystery puzzles, clear puzzles, glow-in-the-dark puzzles, and puzzles so monochrome they test the patience of saints.
During global lockdowns in 2020, puzzle sales surged again. In uncertain times, there is comfort in small solvable problems. A puzzle offers a universe where every fragment has a place, even if it hides under the couch for a while.
Getting Started
Space
Depending on how big the puzzles are you want to work on, you might need a lot of space. For us that means the dining room table. We use a puzzle board so not only help keep the table clean, we can remove the board if we need the table for things like, well, eating!
Make sure your work area is flat and smooth. Although some people like to work on a cloth surface, we prefer a slick surface such as our puzzle board. This makes it easier to slide the pieces around as we try them here-and-there or move assembled sections into place.
Lighting
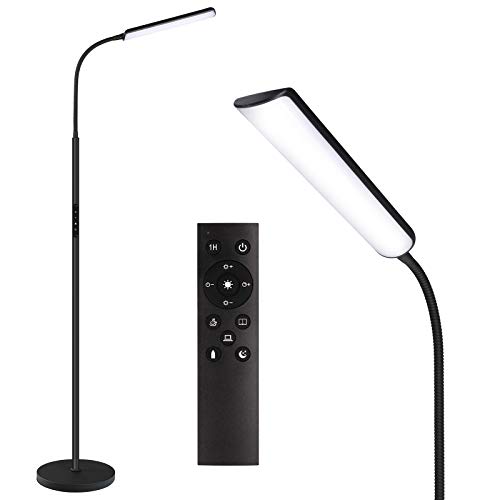
Good lighting is key. Natural lighting is the best for seeing the different colors. In some puzzles, with lots of similar-colored pieces, good lighting is a must. We puzzle in front of west-facing windows so we get good light the first part of the day. As the day goes on and it gets darker (specially in fall and winter), we have to use artificial lighting. Most of the built-in lighting, such as the chandelier above the dining room table where we puzzle, is too bright and harsh. Even with being able to dim the lights, we get glare on the pieces making it very difficult. That’s when we turn on this free-standing LED lamp. We can adjust the angle, the brightness, and even the color temperature, making it ideal for artificial lighting.
Choosing Puzzles
Categories
Choosing which puzzles to make is a personal thing. You may like a particular theme. Like Halloween. Or landscapes. Maybe dogs or cats are your thing. Some folks enjoy making hide-and-seek puzzles where you find the hidden objects after you’re done assembling the puzzle. Whatever your interests, pick puzzles that you know you’ll enjoy assembling and looking at when you’re done. There’s nothing worse than trudging through a puzzle assembly, just hoping you’ll get it done before you give up. Enjoy it!
Number of Pieces
We prefer 1000 piece puzzles, though we’ll do some 2000 piece ones now and then. And sometimes we’ll do 500 piece ones. Our puzzle board is ideal for pretty much any puzzle 2000 pieces or less. Beyond that and we’re in trouble. Much below 500 and we tend to finish so quickly that we don’t feel like we got our money’s worth. You should pick whatever you have room for and will enjoy. A 2000 piece puzzle can take a while to do. If you don’t have the time, or don’t want to tie up your puzzle space for that long, get a smaller one.
Manufacturers
Like with cars, many people are very brand-specific. And it does seems that often, some brands have better quality puzzles than others. Some are less consistent than others. Some may have more of the types of puzzles you like. For whatever reason, we often find ourselves leaning towards our favorite manufacturers. This is where keeping a log can come in handy. Make little notes every time you complete a puzzle. Who made it? What did you like about it? What didn’t you like about it? This can help you better choose puzzles in the future.
Piece Shapes
Edge pieces: Pieces with one or more flat, straight edges that form the outer border of the puzzle. Believe it or not, there are even puzzles without edge pieces!
Corner pieces: A type of edge piece with two straight edges, found only at the four corners of a standard rectangular puzzle. You can find round or unusually-shaped puzzles that don’t have corners too!
Inner pieces: All pieces that are not on the edge, fitting together inside the border.
Irregular pieces: Pieces with non-standard, unique shapes, often used in puzzles designed to be more challenging. We’ve found thin pieces, wide pieces, round pieces, rectangular pieces, you name it!

Piece Cuts
Most manufacturers don’t indicate it on the box, but puzzle pieces can be cut in different ways. Here are some of the different kinds of cuts you will encounter on your jigsaw journey!
Ribbon cut (or grid cut): Pieces are cut in straight lines, often in a grid-like pattern, with predictable shapes.
Random cut: Pieces have a variety of shapes and sizes, with no two pieces necessarily being the same.
Whimsy cut: Includes specially shaped pieces that resemble specific objects, animals, or other figures within the image.
Double-sided: Puzzles with a different image on both sides of the pieces.
Strip-cut (or progressive cut): Pieces are cut in strips, which can be challenging to connect.
Finding New Puzzles
What are the best places to get new puzzles? Just about anywhere! Any time we find ourselves in a retail, brick-and-mortar store, we always check out the puzzle section. Meijer, Kroger, Wal-Mart, Ollie’s, Hobby Lobby, you name it, they all have puzzle departments. And if you keep an eye out, they often have sales!
All of the major puzzle manufacturers, such a Buffalo Games, White Mountain, etc. have online stores and many have physical stores too. Visit your favorite websites to get more information.
There are also stores dedicated to selling puzzles. One of our favorites is The Puzzle Store in Sevierville, TN!
And of course, check out Amazon! Specially on Black Friday we’ve found fantastic sale prices on new puzzles on Amazon!
Finding Used Puzzles
We’ve had great luck with used puzzles. Rarely do we encounter missing pieces. And often, it’ll be indicated on the box if there are missing pieces. Don’t let a missing piece or two stop you from buying and assembling a puzzle you’ll enjoy!
You can also find puzzles at many donation centers, such as Goodwill and the like. Antique stores and malls and flea markets can also be a great source. Also, check your local library, as many have puzzle exchanges.
Of course, you can often find a wide variety of puzzles on Facebook Marketplace and the like. You might also find local exchange groups and puzzle clubs on social media.
Unboxing
Opening
You bet that you can rush home after getting that new puzzle, rip open the box, and dump the pieces out and get to it. But don’t. Resist that urge. Specially with a brand new puzzle. Most (many at least) have puzzle dust. That’s the little pieces of wood and paper fiber that come off the pieces either during the manufacturing process or transit. It loves to get everywhere. If you just open that box and dump them out, you’ll have it everywhere. So open the box slowly, and take the pieces out by hand or dump them out in the box lid or bottom first and not directly onto your workspace.
If you do get puzzle dust all over just use a small vacuum to gather it up. If you work on a mat or cloth, just take it outdoors and shake it out.
Sorting
I sometimes think that how one sorts their puzzle pieces is an almost-too-personal of a question. Some people don’t sort at all, they just open the box and start puzzling. That’s not us. We have to go about it what we think is a more methodical way. We get our sorting bins out (we use leftover sandwich meat containers!) and we start sorting by color and pattern and edges. Edges go out onto our puzzle board first. We sort (as best we can) the non-edge pieces either by color or patterns or both. Say we’re working on a puzzle with an old store in front of a scenic background. The store sides may go into one box. The path in front of the store in another. The sign above the store in yet another. Same with with the shop windows. The green hills in the distance in another. And so on. We try to sort as well as possible, but without taking hours and hours to quibble over each and every piece. After all, we want to get to puzzling!
You should find your way. Ours may not work for you.

Assembling
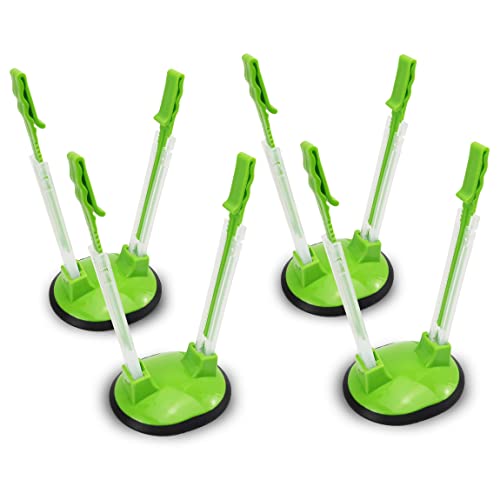
How one assembles a puzzle is right up there with how one sorts. It’s up to you. For us, we always do the edges first. Then we find easily identifiable objects in the puzzle and do those next. Like a dog maybe. Or a bicycle. A sign. Something that is easy to find in the puzzle picture and in the puzzle bins that we’ve sorted out. These objects don’t have to connect to anything assembled when we start. We might ‘work them’ off to the side of the puzzle. When they are done we use our spatula to lift them up and put them approximately where they should go in the finished puzzle. Eventually we’ll tie them in with other things around them. Doing the objects first accomplishes two things. First, they’re easier to find the pieces for and assemble. And second, it reduces the number of pieces left in our bins, making the harder sections easier to complete.
One thing you do have to watch for is a ‘false fit’. What’s that? That’s when you think a puzzle goes somewhere but it really doesn’t. These can be particularly troublesome. And often, very hard to find. Often they are in edges, but can be anywhere. How do you know? Well, if you get down the end of edge pieces or the last pieces overall, and nothing you have left fits anywhere, you’ve got a ‘false fit’ somewhere. I’ve found that good lighting can help find them. And so does turning the puzzle over to look at how the pieces fit from the non-pattern backside. It’s easier to find gaps or ill-fitting pieces that way. So if you suspect a section is wrong, just separate it from the puzzle, flip it, and get to examining and hopefully you’ll find the culprit!
Missing Pieces
So you get to the end of the puzzle and pieces are missing. You’re sure you don’t have any ‘false fits’ (see Assembling, above). What do you do now? We’ve run into this and luckily, each time it really didn’t bother us. Well, not much. Now, if we were framing a puzzle it probably would. But if we’re just in it to enjoy the assembling and the final picture (even with a black hole in it), we’re ok.
But let’s say you’re not ok with it. What do you do now? If it’s a new puzzle, try contacting the manufacturer. Go their website and find a ‘contact us’ link. Tell them the puzzle name and size and have a good picture of the section with this missing piece and hopefully they’ll send you one.
I’ve actually seen piece manufacturer their own pieces. They take a piece of cardboard and cut into the missing shape, at least as closely as possible. Then they use markers, crayons, or even color pencils to try and mimic the image on the missing piece. I admit, they’re a lot more creative (and patient) than I am!
If you decide to donate, sell or trade a puzzle with a missing piece (or pieces), do the right thing and indicate it on the OUTSIDE of the box. That way people know going in what they are in for.
What do I do if my puzzle is missing a piece or pieces? Research puzzle companies that will replace a piece. Research how to make your own piece. Make sure you put a note on box (blue painters tape sticks best, use permanent marker)
Noise
Some folks like to puzzle in quiet. And some like a little noise to go with it. We found ourselves bouncing around depending on the mood. Sometimes we’ll just open a nearby window and listen to the birds. Others we’ll put on a low-key non-action non-loud movie (the Hallmark Channel is good for this!). Or we’ll put on one of the many free music channels our cable company has. Amazon Music is another great option. Podcasts, too. And even sound effect machines. Whatever you choose, choose something that makes your puzzle experience even more enjoyable!

Breaktime
Make sure you take a break from puzzling. It’s easy to get lost in assembling a puzzle. The hours just go on by. That’s kind of the point to puzzling, right? It’s not just about the final piece going into place. It’s about the first one, the last one and all of the pieces between. So take a little break now-and-then. Stretch. Take a walk. But, if you have pets or kids you might want to take precautions that you don’t come back to a puzzle disaster. Cover your puzzle. Use towels, sheets, puzzle covers, something. And cover those bins, too. Everything about a puzzle is great toy, specially for cats!
All Done
Enjoying
Well, you made it! You put in that final piece! Now what? For starters, take a step back, breath in, and enjoy the view! Look at everything. The objects, the colors. Remember how certain sections were harder than others. Admire the art. Enjoy the picture. Just stop and look.
And if you want, get your phone out and take some pictures! Share them on social media if that’s your thing! Send them to your friends.
Framing
We don’t frame our puzzles. But we can certainly understand why people do. So many are great works that we would proudly display in our home. Problem is, we do so many puzzles that we love that’d we’d quickly run out of walls. And frames aren’t cheap. We’d rather spend the money on more puzzles!
There are tons of resources on the internet for learning the best ways to frame your puzzles. Try YouTube for starters!
Disassembling
Well, the sad time has come. Time to take your puzzle apart. So what’s the best way? We almost always end up donating or trading our puzzles so we like to bag the pieces. A bag holder makes this super-easy. We use cheap resealable gallon (or smaller) bags. You don’t need the expensive ones, just ones that seal fairly well.
Now here’s where some people disagree. We prefer that the used puzzles we get are completely disassembled. No pieces still stuck together. It would be ‘cheating’ to use those so we break them apart. But, it takes time to do that. If you get a puzzle where the pieces are still together just take them apart if that’s your thing and get to enjoying!
Should you put the edge pieces in a separate bag? That’s up to you. We prefer to not get puzzles where the edges are separate. But if they are it’s no biggie. We just mix them in with the other pieces and sort like usual. You don’t have to. You can use the pre-sorted edges. It’s your puzzle, do you!
Time To Go
So you’re done with that puzzle and you don’t want to keep it or frame it. What do you do with it? Well, same places you find used puzzles will generally take yours too. Donate it to Goodwill or the like. Trade it at your local library. Contact local veterans groups. And nursing homes. Often they’ll take them. Place them for sale on Facebook Marketplace or in a Facebook puzzle trading group. Other people would like to enjoy them too!
Tracking
I like to track the puzzles we’ve made. My main reason for doing so is I can’t remember the many, many puzzles we’ve done and I’d hate to accidentally purchase one we’ve already completed. I also like to see how many pieces we’ve done for the year. I’m not sure why, but I do. To do this I set up a simple spreadsheet in Google Docs that I can access from my phone or laptop. I can also share it with others. It’s great for sending lists of puzzles to see if people want to trade for any of them. It’s not complicated, just the company, artist, name, number of pieces, a comment, and the date we completed it.
You may also want to check out the (not free) app for phones, Puzzle Tracker. It’s available on Google Play and the Apple Store.
Of course, there’s nothing wrong with just writing them down in a notebook.
Tools
There’s no reason you can’t just puzzle today, right now. Just find a flat surface and go for it! But there are some things that might make it a little nicer for you. Things that enhance the process, making it a bit easier.
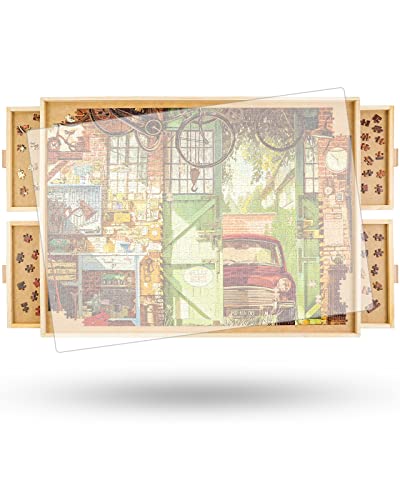
For starters, we use a puzzle board. Did we need one? No. We can use our dining room table. Some people use large pieces of cardboard or even sheets of plastic or wood paneling. We splurged and bought a board. It has trays but we don’t really use them. What we really like about it is that we can lift it up and slide it under our sofa in case we need our dining room table. That’s a major plus for us! It has a plastic sheet that is normally used under the puzzle but it can also be placed over the puzzle to keep little kitties and kids out of it!
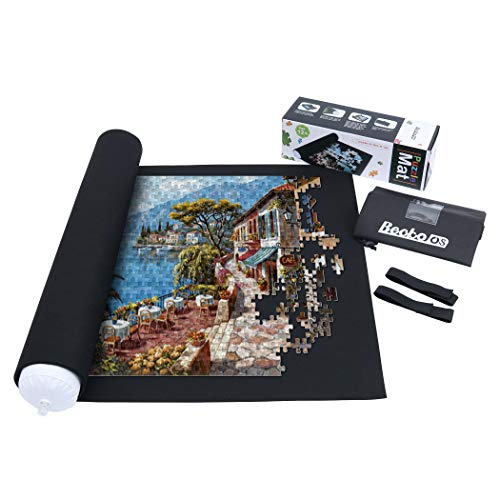
Some folks like using a rollup puzzle mat instead. We have one but didn’t find that it rolled up that well. And it unrolled even worse. And it got horribly dusty from the puzzle pieces. But, instead, we put it under our puzzle board and it’s great! It sticks out a few inches on each side, giving us a good non-slide spot to assemble sub-sections of the puzzle!
Storage bins. Well, sorting bins really. We use them. A lot of them. You can buy some or use something you have around the house. We have a ton of old sandwich meat containers. They hold about 2 cups, perfect for sorting puzzle pieces. And they have lids. Score!
Good lighting is key, as I mentioned at the top of this FAQ. If you can get good, non-glare lighting in your puzzle space, you might want to check out indirect lighting. The one we have has adjustable color, brightness, and angle. And it has a remote. It’s great (most of the time). Sometimes, its hard to get rid of glare, specially with some of the newer, glossier puzzles.
Questions
Stuck? Use the form at the bottom of this page to contact us with your questions. We’ll be happy to help!